1: Start by opening the Flatpay portal with the customer's login here: https://portal.flatpay.dk/terminals
2: Go to “Settings - External access”
3: Copy the GUID
4: Find the menu item “Flatpay companies” in Pos and click “New”
- In the display name, enter “Pos1 - Flatpay”
- In “Company GUID”, paste the GUID from the Flatpay portal.
- Click “+” to register webhooks (these are activated in step 6).
5: Adjust the configuration on the POS agent:
- Find the menu item “Agents” in Pos.
- Here you find the agent used on the POS (PC name) and double-click it.
- Then click “Edit” and fill in the drop-down fields “Flatpay company” and “Flatpay terminal”
6: Enable Flatpay in AppBuilder and turn off any other integrations
Access AppBuilder as follows:
- Search for “Settings” in “Financial”
- Then proceed as shown in the image below - REMEMBER to select, under “Level”, the agent (PC name) that belongs to the POS.
- Click “Save”
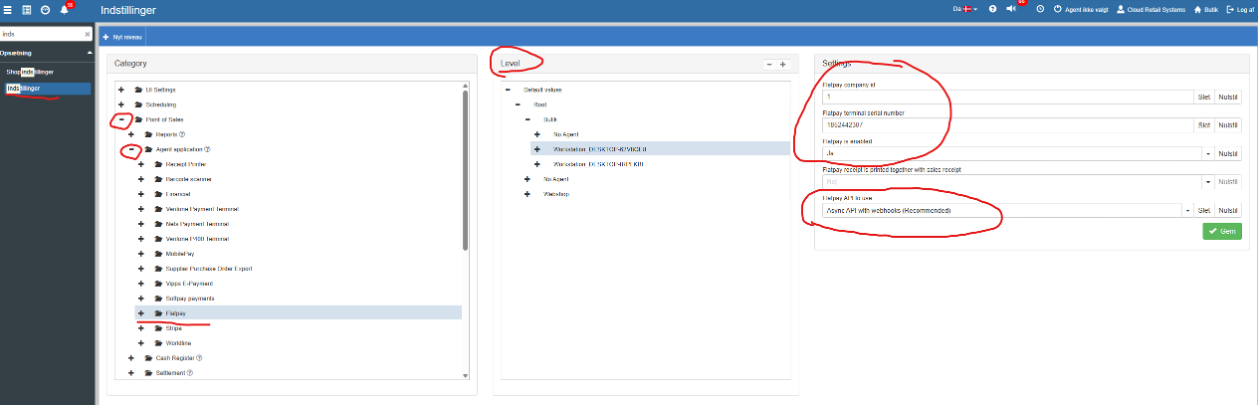
NOTE: make sure other integrations are set to “0” in enabled if they previously had another card integration such as Verifone or Nets.
When setting up more than one POS - repeat steps 3, 4 and 5.
Want to know more?
Read more in these related articles:
Aiia integration
Aiia integration
MobilePay
Enable MobilePay as a payment method in Pos, and control whether the MobilePay POS integration is supported in Sapera.
ePay
Settings for Sapera's integration with the ePay payment gateway, so your webshop can accept card payments.
