1: Obtain an Agreement Grant Token
To obtain an Agreement Grant Token, follow these steps:
- Log in to your E-conomic account
- Enter the following installation URL in the browser's address bar: https://secure.e-conomic.com/secure/api1/Redirect.aspx?returnUrl=https%3A%2F%2Fsecure.e-conomic.com%2Fsecure%2Fapi1%2FRequestAccess.aspx%3FredirectToken%3D2c97882d-bd8e-4090-9eea-87990b65f978&locale=
- Click the “Add app” button
- An editor with your Agreement Grant Token will then be shown
2: Activate E-conomic in settings
The E-conomic integration must first be activated in the AppBuilder settings.
Settings category: “Accounting”, setting name: “Is Economic Integration Supported”
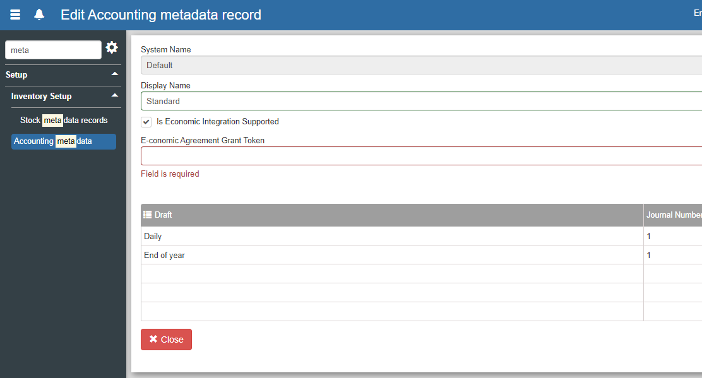
3: Activate E-conomic for the accounting metadata
- Go to “Financial”
- Go to the “Accounting/Integration” list and open the relevant metadata record for editing.
- Tick “Is Economic Integration Supported”
- Enter the Agreement Grant Token in the “E-conomic Agreement Grant Token” field
- Specify the draft-to-journal-number mappings for the drafts to be imported into E-conomic.
Want to know more?
Read more in these related articles:
Microsoft Business Central Integration
This article explains how the Microsoft Business Central integration is set up and configured in Sapera
Accounting/Integration
Under Accounting/Integration you create and name the company's accounts and link them to organizational units. Here you also activate integration with external accounting systems such as e-conomic, Inventio.IT A/S Business Central and Microsoft Cloud Business Central, and configure the required connection settings per account.
Overview of the POS screen
In this article we go through the structure of the POS screen (the POS interface) in Sapera. The aim is to give you a quick overview of the various functions and buttons you encounter when completing a sale.
