NOTE: the steps below assume that the Tenant and DNS lookup have been set up.
NOTE: changes to settings must always be made at the Root level
Search for “Settings” under “Financial”. Navigate to the following items and replace the template text:
- Financial → Reports
- Financial → EAN Invoice (this is filled in ONLY if the customer has ordered EAN sending from Sapera
- Point of Sales → Cash Register (the store's phone number is entered second from the bottom of the page)
- Point of Sales → Reports
- Point of Sales → Settlement
- Point of Sales → Exchange labels
- Point of Sales → Agent application → Receipt Printer
- JIRA integration (enter the customer's store name here - the name MUST match the customer's JIRA name)
REMEMBER to create the customer in JIRA and Confluence (links to these can be found at the bottom of the guide)
POS adjustments:
“Pos” → “Agents” (here the POS for the store OU must be selected)
Store register setup
“Financial” → “Stores”
Relevant information about the store is added here (REMEMBER Invoice email and Primary email - both must be filled in! The same applies to SMS, office and home phone numbers!)
“Financial” → “Default texts”
Here “Customer name” is replaced with the store's name
REMEMBER to remove the default text at the Root level
“Financial” → “Work card types”
Here “Customer name” and “XXXXXXXX” are changed to the store's name and phone number.
EAN setup
If the customer is to use EAN sending from Sapera, the customer must be created in DigitalCab (link to DigitalCab can be found at the bottom of the guide)
Furthermore, the inventory group must be given permission for “EAN invoices” - tick the following in “Financial”:
“Groups” → “Inventory management” → “Navigation” → “Financial navigation” → “Access invoice EAN”
My Day setup
If the customer is to use “My Day” in Sapera, the inventory group must be given access to the “My Day” menu item.
“Groups” → “Inventory management” → “Navigation” → “Financial navigation” → “My Day”
(In the templates, the Admin user has been given access to manage “My Day” for others)
Service reminders (Often only applicable to bicycle/motorcycle stores)
If it is a bicycle customer and they want to use service reminders, the text in “Service types” must be adjusted, i.e. phone number and customer name.
“Financial” → “Service types”
Users (REMEMBER to send the user list to SK/HCJ)
“Financial” → “Users”
The desired users are created here.
REMEMBER to set them as “On behalf of” the Pos and Admin user.
REMEMBER to create them in Shop settings (so they can be used in the calendar and “My Day”)
If the customer is NOT going to use the Finance part of Sapera, the Finance group must be removed from the Admin user, and instead the group “External accounting” must be assigned to the respective employees.
With Webshop integration
If the customer wants to have a Sapera Webshop, the following 9 steps must be performed:
First, a Webshop OU must be created at the same level as the store.
This is done by clicking “Security” in the burger menu and then “Organizational units”. Here you position yourself on “Root” and click “New”
The permissions on the Webshop group must then be adjusted so that the Webshop group grants access to the newly created Webshop OU. Then the Webshop group must be assigned to the respective employees.
A store register must then be created on the Webshop OU (9 out of 10 times it should be identical to the one on “Store”)
“Financial” → “Stores”
The “Automatically reconcile invoice” checkbox is set in “Finance setup” in “Financial” on the Webshop OU. Set the bank account as the finance account.
The finance setup for the Webshop OU is adjusted to match the setup on “Store”
Adjustments must also be made in “Inventory setup” in “Financial”, so that the Webshop OU uses the Store's Sales price Org. unit and the Store's Inventory Org. unit.
Furthermore, changes must be made in AppBuilder - the following settings must be changed:
- “Is Web Products supported” must be set to “Yes” - the setting is located in “Financial” → “Settings” → “Inventory” → “Product”
- “Automatically make in progress on save” must be set to “No” - the setting is located in “Financial” → “Settings” → “Financial” → “Sales Order”
A new product category must also be created, which must be called “webshop_levering” containing the following services (REMEMBER they must all be of type “Service” and they must all have 0 DKK in sales price and cost price):
- flat_rate
- free_shipping
- local_pickup
- shipmondo
The 4 services above are located in “Templates” and just need to be activated (applies only to Tenants newer than 26-08-2024)
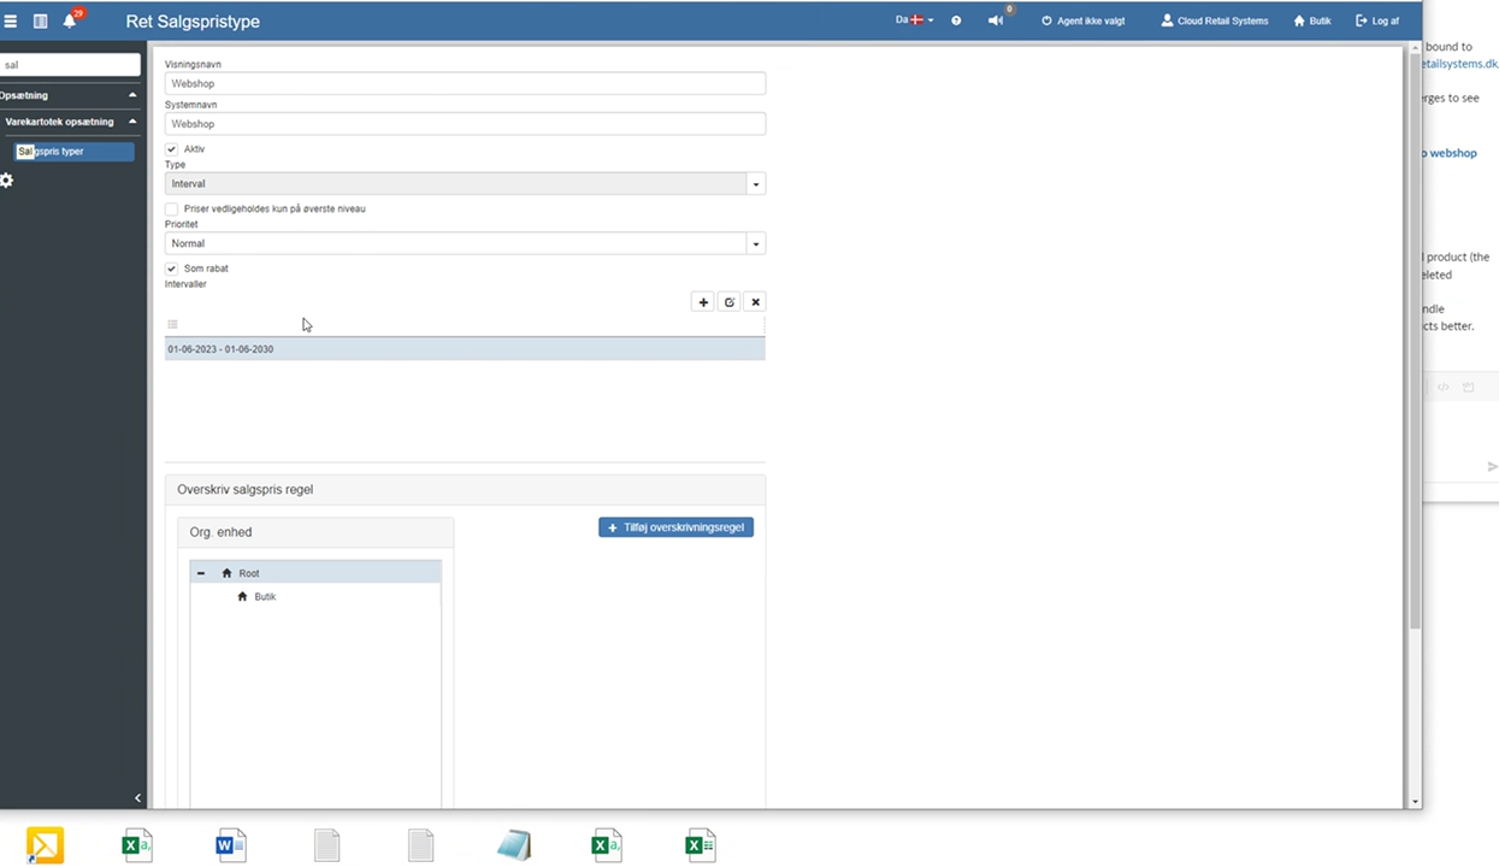
Finally, create the sales price type below as shown in the image:
Digital Inbox
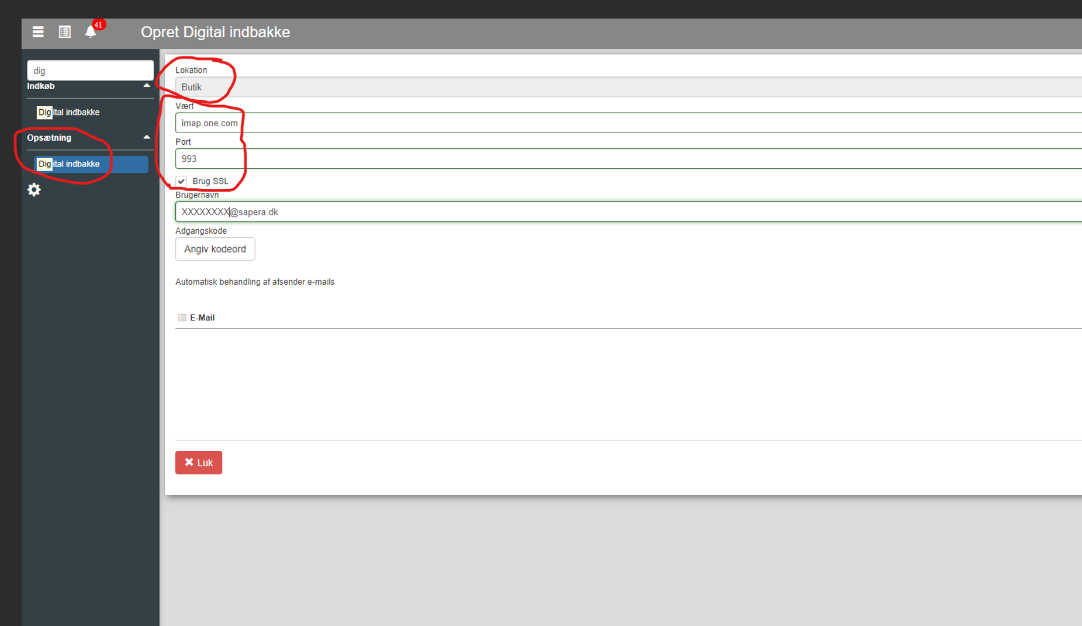
If the customer is to use “Digital Inbox” in Sapera, the customer must be created here: https://www.one.com/admin/mail/overview.do with their CVR number and a (16-character) password from a password generator.
After that it must be created in Sapera in “Digital Inbox”, located under “Setup” - “Host” and “Port” are ALWAYS filled in as shown in the image below and the location is “Store” (unless otherwise agreed).
In “Username”, enter the email created in one.com along with the associated password.
Finally, permission is given to the “Digital Inbox” menu item on inventory groups (unless otherwise agreed)
“Groups” → “Inventory management” → “Navigation” → “Financial navigation” → “Access incoming e-mails”
Setting up internal transfer
Activate internal transfer customer with customer no. 962330000
Activate internal transfer supplier with supplier no. 962330000
Create 2 journals in “Internal transfers”
Select the created customer and the created supplier.
Tick “Post to finance”
The first journal must be called “Transfer to cost price +10%” and the associated price must be selected in the bottom field.
The second journal must be called “Transfer to cost price” and the associated price must be selected in the bottom field.
Create a posting journal for internal transfer.
Adjust the inventory setup (search for “Inventory setup” in “Financial”)
After the chart of accounts has been imported, posting must be set up for these items (all menu items are found in “Financial”):
- Product categories
- Finance setup
- Customer categories
- Supplier categories
- Payment-in options
- Payment-out options
- Card issuers
- Finance periods (check that the finance period matches the customer's wishes)
- Chart of accounts (including counters)
- VAT types (if it is a former CB customer, the VAT types are transferred from CB)
Preparing a Sapera solution with more than one OU
When a customer needs more than one OU (or an extra OU on an existing Tenant)
First, click “Security” in the burger menu and then “Organizational units”
Here you position yourself on “Root” and click “New”
Then create the following (NOTE: a store register must be created for each OU):
- “Warehouses” - new warehouse
- “Accounting/Integration” - new account
- “Inventory setup” - adjustment
- “Finance setup” - adjustment (mock accounts are set temporarily until the finance check)
- “Number series” - creation (both inventory and posting number series)
- “Posting journals” - creation
- “Inventory journal” - creation
- 2nd. “Finance setup” - set the new journals
- 2nd. “Inventory setup” - set the new journals
- “VAT types” - creation
- “Label journals” - creation of a label journal
- “Finance periods” (check that the finance period matches the customer's wishes, and otherwise adjust it)
- (Optionally, if the customer wants this → “Actor division” - creation + assignment to OUs)
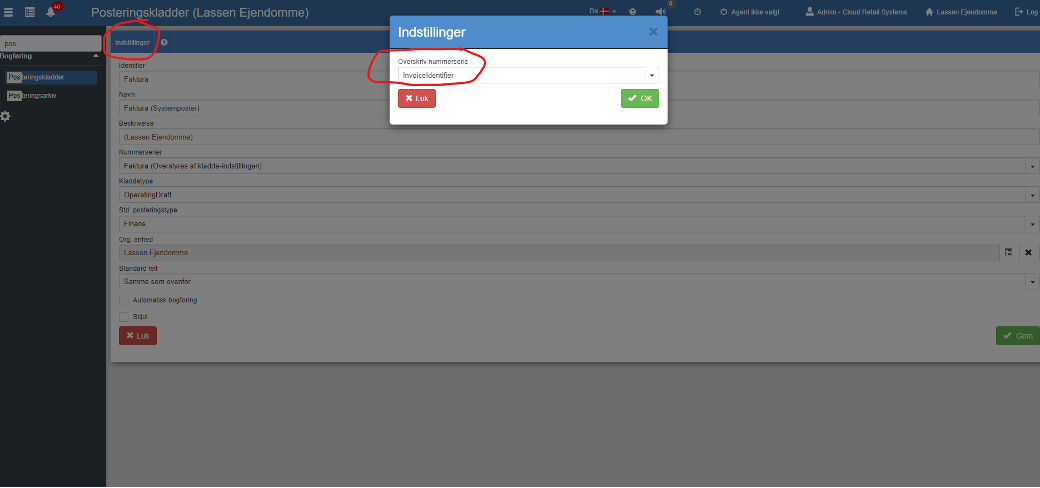
REMEMBER to override the number series on the “Invoice” journal. This is done in “Posting journals” by clicking “Edit” and then “Settings”
- See the image below (“Financial” → “Posting journals”):
POS (“Pos”):
- Cash register: New cash register (a cash register must be created for each OU except “Root”)
- Agents: (Select the correct cash register - the one that matches the OU)
“Financial”:
- Groups: A security group is created for each OU, which must grant access to the respective OU.
- Users: Remember to create users (Pos and Admin) for the respective OUs. Optionally use the postal code in the name to distinguish them.
Links:
Jira: https://mbsolutionsgroup.atlassian.net/jira/servicedesk/projects/SAP/customers
Confluence: (CRS' documentation) https://mbsolutionsgroup.atlassian.net/wiki/spaces/MBSG/pages/534052924/Kunder
DigitalCab: https://login.digitalcab.dk/digitaxikunde/secured/virksomhedensIDer.aspx
Want to know more?
Read more in these related articles:
Computer/Windows setup for optimal daily use with Sapera
Computer/Windows setup for optimal daily use with Sapera
Accounting - Finance setup
This article explains how to configure finance setup in Shop Manager
Getting started - What do you need to know as a customer?
Before we go live with your Sapera solution, it is important that we have a shared understanding of what has been agreed and how the delivery process will be. This guide gives you an overview of the most important points before, during and after delivery.
