The purpose of a VAT balance is to provide an overview of the company's VAT-related financial transactions in a given period, optionally limited to an account range. The VAT balance is primarily used to compare the expected VAT rate with the actual posted VAT amounts.
The VAT balance is a good control tool: by using the VAT balance, the company can check VAT-related transactions and ensure that no errors or omissions occur in the VAT accounting.
The printout can be generated as PDF, Excel or sent as an attachment by email. See print dialog.
From Financial, go to "Accounting" → "Chart of accounts".
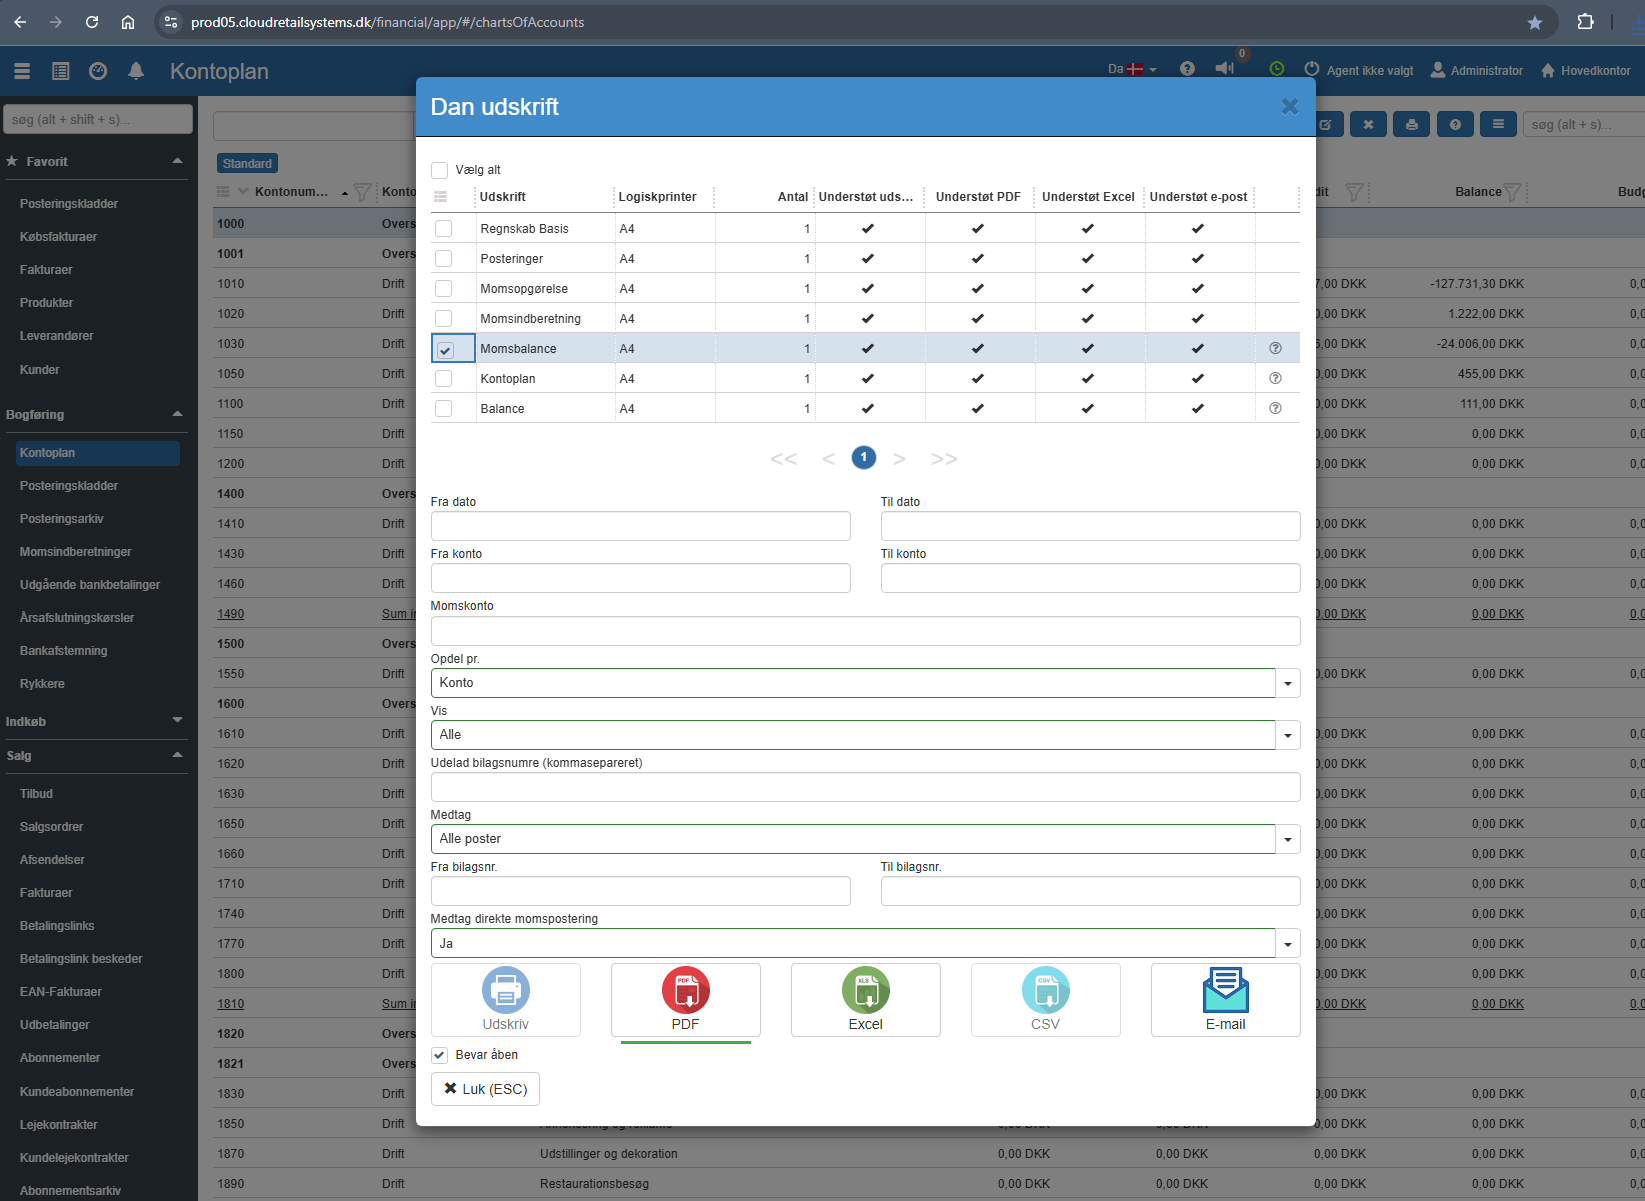
On the chart of accounts page, click the printer icon in the top right corner.
Select the "VAT balance" printout.
Fill in the fields (the fields are described below).
Select the desired print format.
The options are described below:
Specify the start and end date for the printout based on the financial date.
Select the account range that the VAT balance printout should cover.
Here you select the VAT account the printout should be based on.
Select whether the printout should be split by "Account", "Voucher" or "Account & VAT type".
When selecting "Account" the extract is split by each individual account in the chart of accounts that has associated VAT postings.
When selecting "Voucher" the extract will include rows for each voucher with related VAT postings.
When selecting "Account & VAT type" the extract is split by both account and VAT type.
If you want to limit it to a specific VAT account (e.g. output VAT), you can enter the relevant VAT account number in the “VAT account” field.
You can choose to show all accounts, regardless of whether the expected VAT amount matches the actual VAT amount, or whether there is a difference. You can choose between "All" and "Difference only".
All: all accounts are shown – regardless of whether the expected and actual VAT amount match.
Difference only: only accounts with a difference between the expected and actual VAT amount are shown.
Here you can specify which voucher numbers should be excluded from the printout. Multiple voucher numbers are separated by commas. Known vouchers that should not be included in the extract can be specified here.
You can choose to include all accounts, regardless of whether the postings have previously been reported to the tax authority or not. Choose between "All" and "Only not VAT settled".
All: all accounts are included, regardless of whether the VAT postings have been reported.
Only not VAT settled: only unreported postings are included.
Account no.: Shows account numbers in numerical order.
VAT type: Shows the VAT type belonging to the account in question.
VAT %: The expected VAT rate (set up on the VAT type).
VAT account no.: The VAT account on which related VAT postings are posted.
Voucher no.: Shows the voucher number – if "Split by" = Voucher.
Posting count: How many postings are posted to the current account.
Posted amount: The sum of postings matching the criteria, posted to the account.
VAT amount: The sum of related VAT postings.
%: The actual percentage rate (VAT amount / Posted amount) * 100.
Difference: The difference between the expected and actual VAT amount as a percentage.
In the following example, we have manually posted a posting to 1010 Cash sales of DKK 100 with the bank as the contra account. By mistake we did not set a VAT type – we will now correct this.
This error can be detected via the VAT balance.
For example, by selecting the following criteria on the VAT balance printout (see image):
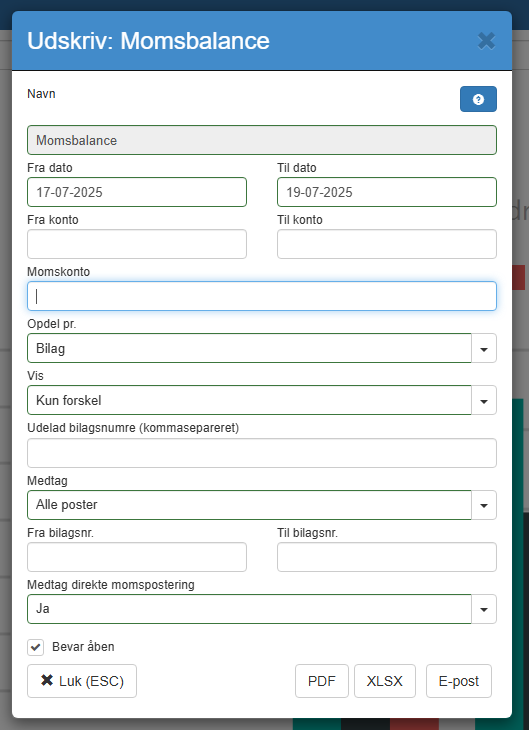
Note:
Show: Difference only
This means that we only include postings with differences.
Split by: Voucher
This means that we get a split by voucher number, so we can subsequently examine the voucher in question (see posting archive).
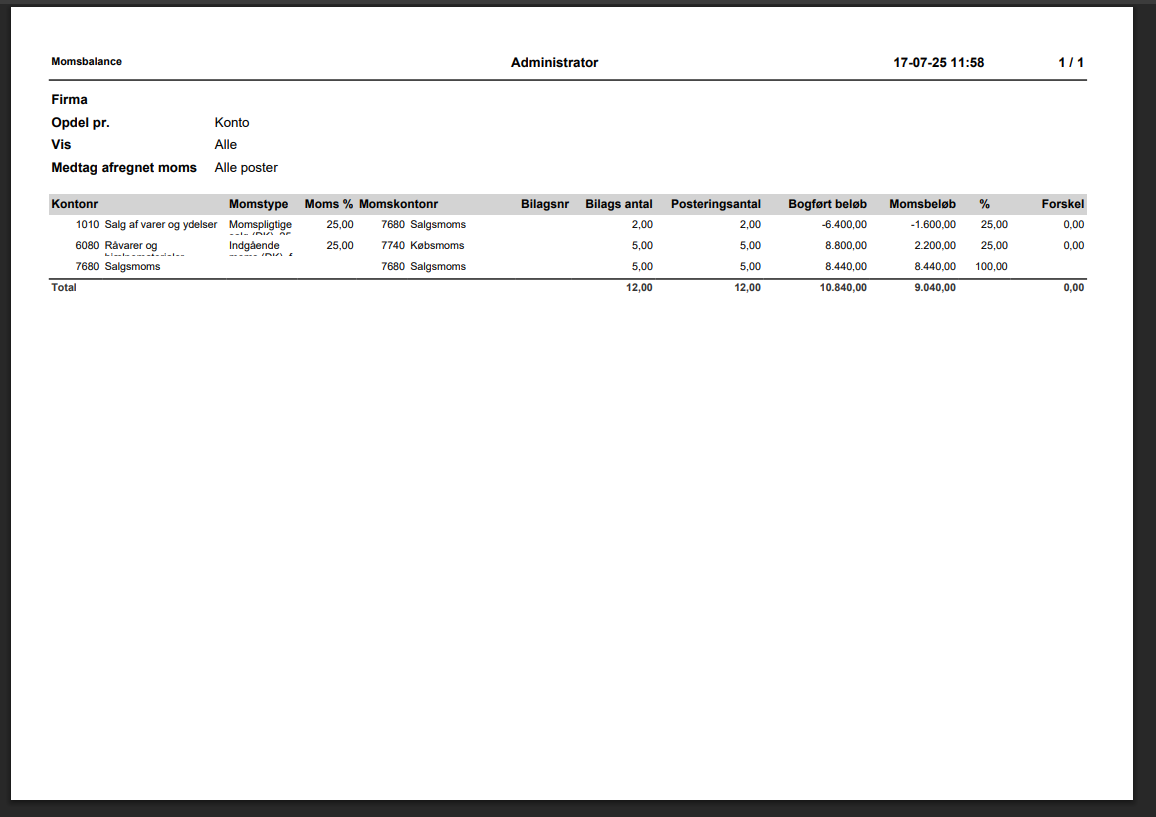
The generated printout shows the following result:
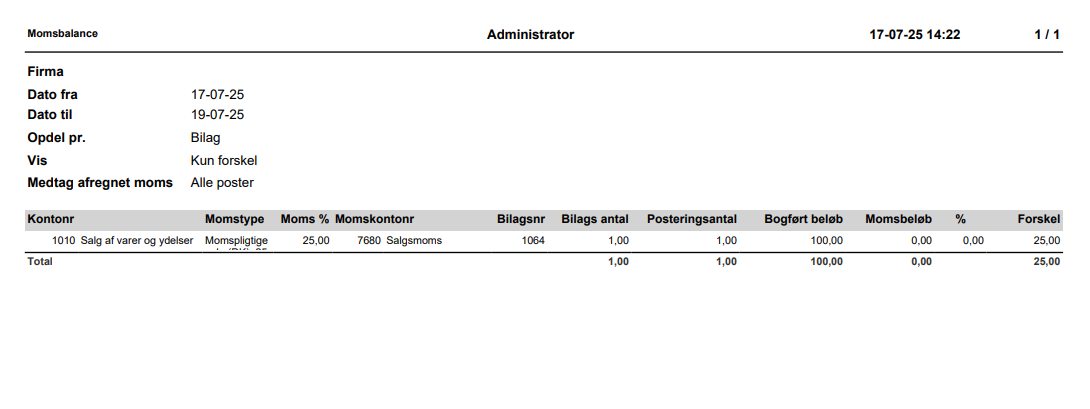
Here we can see that voucher number 1064 is posted without VAT.
We can go to the posting archive and find this voucher.
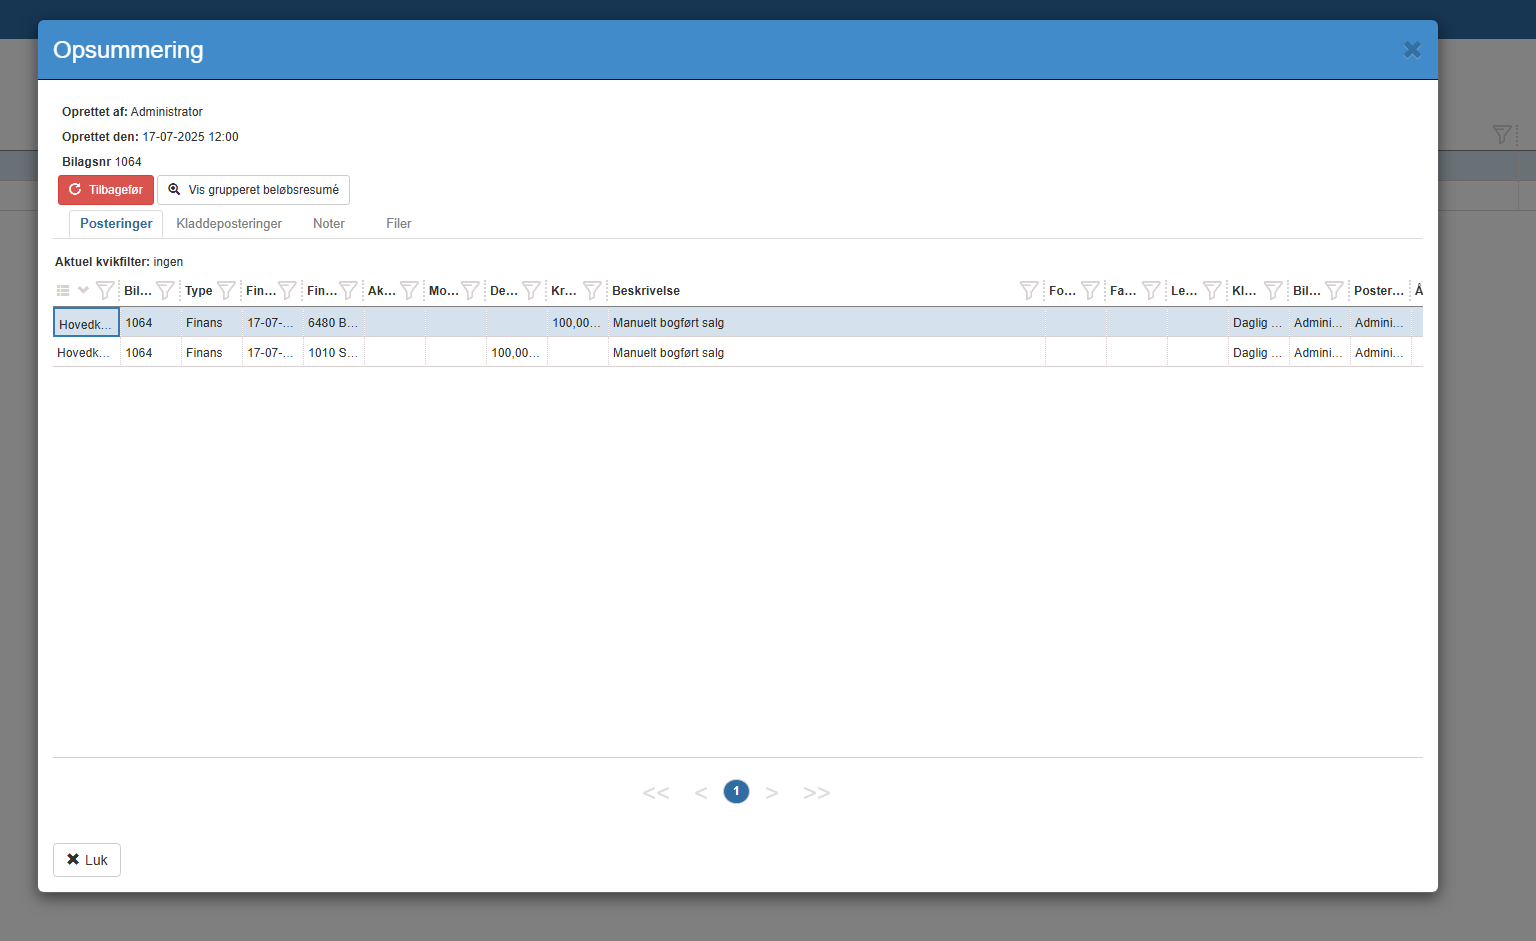
Here we can see that we forgot to set a VAT type on the manually posted sale. We can now, if desired, reverse the voucher and post it correctly.
This printout has no special configuration settings beyond the choices shown in the print dialog. If you have specific wishes for the printout's appearance, you are welcome to contact support.
Want to know more?
Read more in these related articles:
Finance setup
The finance setup determines which finance accounts and posting journals Sapera uses when the system automatically generates postings for sales, purchases, till closing, stock adjustment and year-end closing. Here you configure default accounts, journals and integration settings per organizational unit.
Cash customer payments
This article explains the criteria and columns for printing cash payment lists in Sapera
General settings
General system settings in Sapera. Here you specify the time zone that times on receipts, journals and reports are displayed and calculated from.
